Knowing How To Paint Baseboards Like A Pro
If you are looking to know how to paint baseboards, having a professional finish, you've landed on the right page. Here, we will discuss how to paint trim and baseboards. Also what you will need completing this monumental task, one you will be very proud showing off to friends & family.
Baseboards and trim in general is such a large portion in a home's interior. They are are seen by most of us, pleasing to the eye of refinement, unless of course they are dirty, scratched, cracked, or unsightly. Thereby needed a fresh coat of premium paint to bring them up to today's painting standards.
Having been inside many homes over the years, most baseboards are painted correctly, however those I remember the most were not, looking like a third grader had a weekend project. No matter how bad, all are easy to correct with a little time, effort, and patients.
Before Professionally Painting Baseboards
First order of business is to clean baseboards before painting. Cleaning baseboards is typically done by the homeowner on a regular basis, or the painting contractor's professional painters. Easiest way is to take a damp wiping cloth or wet sponge, removing any dust and or foreign matter that always seems to collect on top, next to the wall, near the floor.
Using a mild soap such as Dawn, diluting it as you would washing dishes will work fine. We generally use a damp cloth for cleaning, and a dry one to wipe dry. Your new baseboard paint, will glide on by your brush much nicer, giving you a clean canvas to work on.

I know cleaning baseboards seems like a mundane task at hand, but remembering this is how professionals do it, so that should give you even more reason to paint baseboards correctly the first time around.
Once baseboards are cleaned and properly dried, it is time to start you major task of painting baseboards like a professional.
Items You Need, Painting Baseboards Like A Pro
First item you want to invest in is a good sash brush. Normal width sash brushes used for most baseboards is a 3'' Purdy™ sash or angle brush. Several to choose from, but Purdy™ is by far, the very best brush you can ask for.
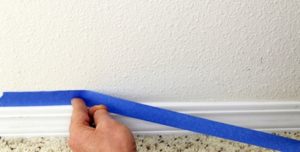
Next item is painters tape. If carpet is involved, you'll want to run a long piece of regular masking painters tape 1.5" wide on the carpet next to the baseboard, having a .25'' up on the side of bottom edge of baseboard.
Once you have run your tape, you'll want to press this tape edge down, normally using a 4'' wide putty knife, between the carpet and baseboard. This protects your carpet from any paint drips, or brush marks. If you do get a minuscule amount on carpet, don't worry! Will tell you what to do with that later.
A small canvas drop cloth is good to have at your disposal. Using this drop cloth close to your painting, thereby catching any possible drips you may experience. Professional painters rarely drip any paint, knowing how to load and work the paint brush, going from the can to the baseboard surface. However, if this is your first time, highly recommend you have this drop cloth just in case.
Pro painters generally use a "Cut In Bucket", when painting trim. The typical average size is a 2.5 gallon. Not too big, nor not too small, which allows loading a brush or small roller into it. No need to fill this bucket up with no more paint than you will use in say a given hour. Therefore, pouring a few inches into it is a good idea.
After pouring paint into cut-bucket, take the brush you'll be using, brushing out the paint left in the top of the can where the lid seals, as well as any on the sides of can. No need to wipe it with a rag or towel, as your brush will do just fine. This will keep your gallon can nice and clean for next use. If you don't wipe this paint from original gallon, it will continue to drip, where ever you have it sitting.
If you feel like it, having a small paint grid that fits into this painters bucket is good, but not necessary when using just a brush. Once dipping brush into paint, loading it up, you'll want to give the brush a light slap on each side of bucket, removing excess paint before pulling it out. This properly loads up your brush, not having too much, but enough to get started painting the baseboard.
Baseboard Painting Items Needed
- Top quality sash or angle paint brush
- Painters masking tape
- Canvas drop cloth
- Cut-in bucket
- Paint Grid
Professional Techniques Painting Baseboards
Having experienced professional techniques painting your baseboards will not only add to the final appearance, but ease of actually painting them in the first place. Techniques include holding the paint brush, having the skills laying the paint on the surface as smooth as a factory finish. When the baseboards are painted by brush, but look like they were sprayed, you followed everything, having the best painting techniques.
Holding the paint brush, is very similar to holding a pencil or pen, just like you would with an eating utensil. Unless of course you eat like a caveman, then you'd better not pick up a paint brush. Having the suave, the artists hand is key. Lightly holding it, but strongly enough not to ever drop it. Using your pinky and ring fingers as a guide, this helps making long painting strokes as possible.
Painting baseboards using the longest continuous painting strokes, as your arm reaches left to right is key. As you get comfortable and profess-ant making longer brush strokes, so will your baseboards having little to no brush marks.
Also speaking of brush marks, it is imperative once you make the initial brush stroke, you do not keep brushing, longer than just a couple few more times. 100% Acrylic Latex paint will set up rather quickly, especially the warmer it is, inside your home. As this process is taking place, you do not want to keep brushing, or you will see brush marks left after paint is fully dried. Therefore, limiting the number of brush strokes made is ideal.
Your angle sash brush should be held with tip at the top of baseboard, rest of brush on major portion of surface. Not wishing to make a perfect complete stroke on the first swipe, but good doing this on your second stroke. Ideal making the straightest, cleanest, tight lines possible.
If your paint colors are very different from walls to baseboards, you may want to use painters tape on the wall just a hair's distance off the top of baseboard. This allows you to run a fine bead of caulk, wiping with a wet rag, before actually painting the baseboard. Once baseboards are painted, good idea to pull tape before dried. If you allow paint to dry, before pulling tape, better have a razor knife available, lightly cutting bottom edge of tape, so it does not pull up painters caulk.
Professional Painting Techniques For Baseboards
- Holding brush properly
- Longer brush strokes
- Brush stroke 2-3 times
- If using painters tape, pull when wet
- Use sharp razor knife cutting tape to paint edge
Other Baseboard Painting Tips Pros Use
A few painting tips will make baseboard painting like a pro, much easier and enjoyable, adding to the craftsmanship you have demonstrated. Before you put your sash brush in the paint for the first time, it is best to soak it in water first. Completely shaking excess water out of it. Easiest way doing this is tapping it on your steel toe or heel of boot.
This knocks off, shakes out most excess water, leaving it damp. The reason for this is two fold. One; your brush will lay paint on much smoother, and Two; a damp paint brush wet first, is much easier to clean later, providing you are using Acrylic water borne latex paint.
First off, as you paint, knowing baseboard painting is time consuming, you will want to stop every so often, thoroughly cleaning your paint brush with warm water, removing any paint slugs that might be growing on your brush.
Next tip that comes to mind and is key, is not trying to lay or paint baseboards in one pass or stroke. You will want to lay the paint on just below the top, and just above the bottom on first pass. Using the bristles to your advantage, bending them to exact line on the second stroke. This is important, thereby not having too much at top or bottom. If others watch you, they will all know you are a professional, tackling those baseboards no one else wanted to do.
Last tip wanting to convey, is do not paint baseboards in a hurry. This can be somewhat of a tedious job, making all trim surfaces professionally finished. If you feel that you don't have the time, nor the patients of this undertaking, you might consider hiring this out with a professional local contractor and paint crew handling this for you.
Hope you've enjoyed our baseboard painting tips, as much as I've enjoyed talking about them. Best of luck on your next painting project, and any comments welcomed below.


[…] are many more tips knowing how to paint baseboards like a Pro, before undertaking this monumental painting task. Learning some inside tips and […]
[…] even amount over the entire baseboard surface. Having a professional painting experience, knowing how to paint baseboards like a pro, will not have any marks, lines, or streaks […]
[…] wall painting has dried, it's time to paint baseboards & trim the same color as the rest of the home, without marks, lines or streaks, painting like a […]
[…] painting trim like a pro is a vast amount of information ranges from masking, caulking, priming, brushing, to even holding […]
[…] Allowing cleaners to dry, painting trim, baseboards, and all woodwork without much masking. Protect only areas you do not want paint on, or what will be soon painted, like a pro. […]
Nice job, Cal. You are kind to share your experience