Root Causes Paint Blisters, Bubbles, Chip, Or Peel
Main causes & solutions for both paint failures types being that of blistering, bubbling or other form being cracking, chipping, or peeling. This article also covers main reasons, how to correct each one, helping interior or exterior painted surfaces within your home.
Being able to determine correct reasons for paint failures, what caused them in first place, will point you in right direction, solving each type, so it does not happen again. Not giving up, as I know seeing paint fail can be mind-boggling, but not giving up. Yes, there are several reasons, but for each reason, there is a fix or solution.
Main Causes & Solutions Of Bubbling, Blistering Paint
First, understanding main types or sets of paint failures being bubbles, or blisters being in first set. Paint bubbles or blisters occurs days or weeks after paint was applied. Because if paint has time to cure, stiffening, hardening up, bubbles or blisters could not happen.
Cracks, chips, & peel being another form we know being much harder, caused long after paint has cured, hardening up. Cracks, chips, & peels discussed further in this article.
Main Reasons & Solutions For Paint Bubbles, Blisters
- Inadequate temperatures allowing proper drying process to take place
- Possible bad batch of paint can cause paint to fail
- Foreign matter underneath substrate, not allowing paint to bond properly
- High humidity, moisture on top of fresh paint can result paint to fail
- Paint is not smart, only as good as the substrate it is covering
- Wrong type of paint for what it's intended
- Getting substrate original condition by sanding, priming good answers
- Using a cedar sealer when wanting to keep cedar natural.
- Follow paint manufacture's instructions on back of paint cans
Bubbles & Blisters
Temperatures
Some of the most common causes, also fixes with paint bubbling, blistering that may occur is relatively easy to address, finding solutions. First, 100% acrylic latex paints have a temperature range from 35 degrees, to 90 degrees. If ambient temps drop too far lower than 35, being too cold, or being too hot, above 90 degrees, this is your first line of defense, painting within these temperature ranges.
Those in Anchorage Alaska paint when it warms up during high noon for a few hours, as where those in Phoenix Arizona starts painting as soon as the sun rises, till noon. Key point is to stop painting before these extreme temps get too hot or cold. This will insure latex paints to tack up, starting adhesion processes, properly curing.
Let's say you're in Denver, painting an exterior during winter months. 35 degrees is too cold if it is 3 o'clock, knowing it's not getting any warmer, also a deep freeze is expected later that night.
Or you are in Scottsdale, painting outside during summer months. 90 degrees is too hot, if it is 11 o'clock, knowing temps expected to reach 110 by noon.
Both scenarios will cause paint to blister & bubble like not having any sunscreen what's so ever. Easy fix is not get in a hurry, follow recommended temps for at least an hour after paint is applied.
Bad Batch Of Paint
Out of 10's of 1000's gallons, can only remember getting a bad batch of paint. Paint store knew after selling me the paint, where only one batch had missing particulates or additives in formulation. This inadequate paint bubbled rather quickly, allowing us to easily remove it.
Must be noted this was before the digital world of paint formulation, as paint manufactures manually made these products. Today this is almost impossible, as when something runs low, assembly line automation stops. So buying a bad batch of paint today is almost inconceivable. Remembering not letting a full gallon to freeze, as this will cause paint bubbles just like soap bubbles as you were a kid.
Now speaking of bad paint, very important keeping stored paint within optimum temperature ranges, never allowing it to freeze. Once paint becomes frozen, even thawed back out, it is no good. No telling how many paint problems you would have if applied.
A good place to store left-over paint is in your basement, cigar room, or wine cellar.
Foreign Matter Under Paint
Most common paint failure is applying new paint over foreign matter like bird crap, spit wads, DNA, sap, or oils. I guarantee if you have recently stained wood with a linseed oil based stain will cause paint to blister right before your eyes.
Also guarantee you'll see bubbles applying alkyd oil paints over latex, acrylic ones. This may lay flat for a few weeks, longer than over oil stains, but will bubble no matter what!
Best removing any/all foreign matter before applying final paint coatings, or these are surely to fail. Failing much sooner than rest of emulsion paints.
I guarantee anything that's not suppose to be on surface will cause paint to lift up, bubbling, blistering, ultimately failing. Don't believe me, then paint over any of this crap.
Moisture and Humidity Causing These Paint Failures
Another important weather forecast before painting outside is moisture also humidity. Moisture also humidity causes numerous paint failures each year. If moisture is a concern, questioning this, you might want to buy a very inexpensive moisture meter.
Moisture content must be below 18%, plus never encapsulating board all 4 sides with paint coating. Painting all four sides traps moisture inside wood, not allowing it to breath, drying further out, which brings up another moisture & humidity topic.
Moisture along with humidity, heavy dew can cause both types of paint failures, being blistering, cracking, also peeling. This happens when a paint coating is applied over wet surfaces, thereby causing it to lift or bubble up.
If paint coating applied on a dry wooden surface, but has an opening allowing moisture getting underneath cured paint coat, guess what? It's lifting up. That is why so important having an extreme bond primer underneath troubled areas where moisture can be an issue.
Inadequate Substrates Causes Paint Bubbles
Inferior underlayment can immediately cause blistering, bubbles if not properly addressed. Matter of fact, some are intended not to hold paint, such as cedar shingles. Reason for this is cedar shingles are not intended having a solid paint mil coating on it, as edges soak in moisture every time it rains.
Plastic window sashes, moldings, & PVC gutters also do not accept latex paints. If they do not bubble in first few days or weeks, peeling will surely take place later on.
Another substrate which does not accept latex acrylic paints is clear window silicone caulking. This caulking is much cheaper than painters latex caulk, probably why most window companies use this in the first place.
I'm sure their intention using clear silicone window caulk is that, since it's clear, window installation looks the best. However, once a painter arrives on the scene, this type of inferior caulk must be removed, re-caulking with proper paint-able caulk in order for warranties.
So you see, there are many surfaces, substrates which can cause paint failures from the get-go. Most metals however accepts exterior latex paints nicely, including garage doors, metal front doors, flashing, aluminum gutters, etc. If unsure, best to test first.
Type Of Paint For What It's Intended
Make sure you use a paint for what is intended, as this also can blister, bubble, or later fail. Example of this is never apply a latex paint w/o primers built in on bare wood. Latex paints bonds to a primer much better than bare untreated wood. Primers bond to bare wood, like they are intended to do.
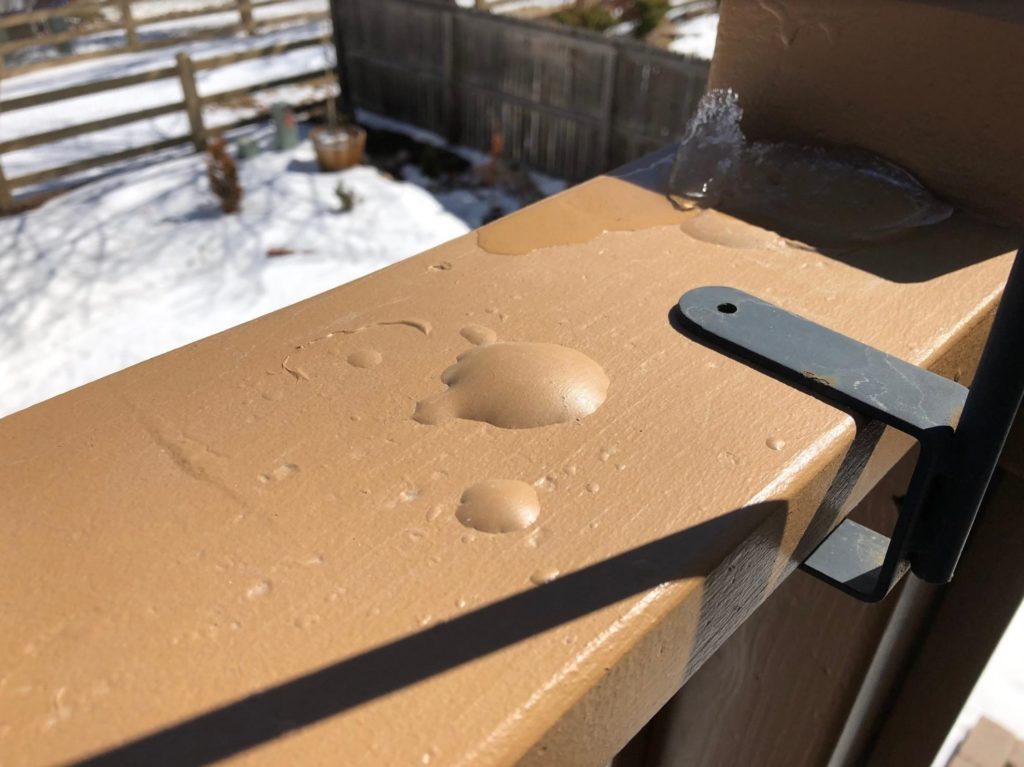
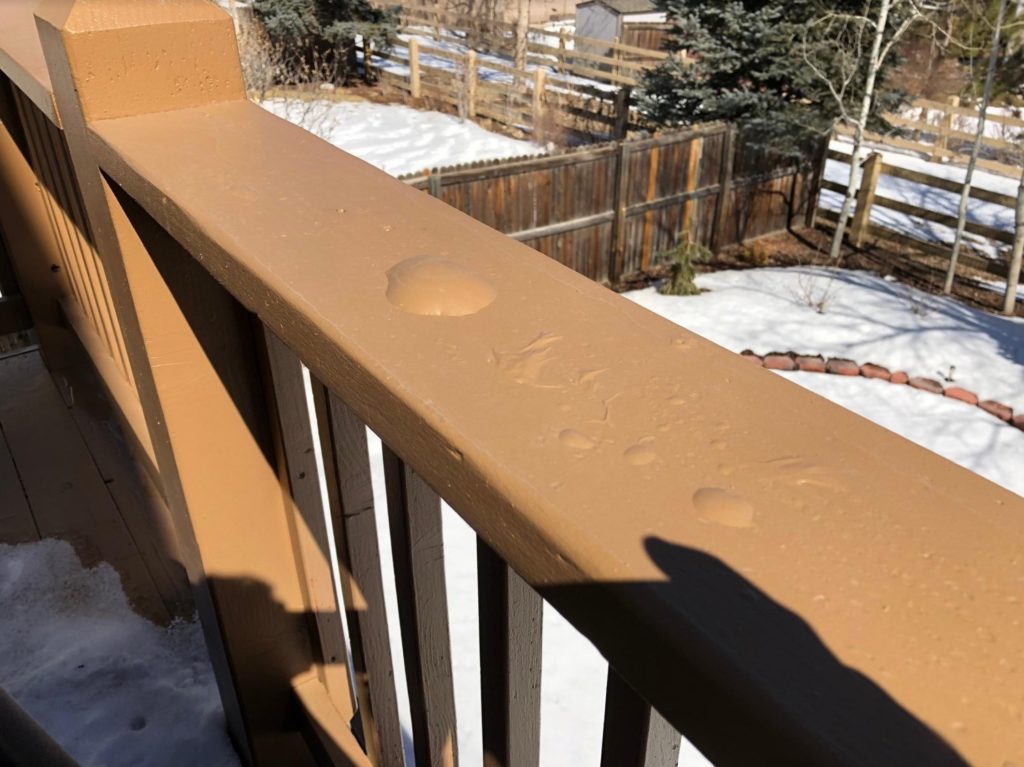
Using high bonding primers will ensure your latex paint not failing. Just like photos above, no primers were used. Some other Denver painter applied least expensive A100 Sherwin-Williams exterior paint designed for vertical surfaces, not horizontal ones like decks & handrails.
Calling me out, giving client my professional opinion, asking what was used. A full can under deck was sitting there. Knew immediately what had happened, but pulled my pocketknife out, digging into paint, lifting up a very small area, seeing no primer.
Giving you some first hand inside info. what just recently happened, using a paint not intended for a particular surface, and main reason for writing this article.
Why Is My Paint Bubbling, Blistering With Exterior Paint?
Wondering why exterior paint bubbling or blistering is very common question when it's either too hot, or too cold painting outside.
If temperature ranges followed, and exterior paint is blistering, you must have something else going on underneath. Contaminates, oils, moisture, all certainly lift paint up, not giving proper adhesion.
Best to use an Extreme Bonding Primer®, by Sherwin-Williams™, or Gripper® by Glidden™ Using quality primers will correct, keeping paint bubbles, blisters from happening in the first place. Importantly, allowing primers to properly dry, normally 24 hours before final paint coat is applied.
Temperature plays an important role with emulsion paint drying properties. Just as temperature is important, so is moisture. Allowing paint to dry with ideal temps, with lowest amount of moisture underneath substrate, allows paints to properly adhere.
100% acrylic paints generally bond, dry to touch within minutes, not hours. If this important time is interrupted, causing much longer or shorter drying periods, chemical breakdowns occur. Seeing paint failures within days, months, or years.
Very rare you ever get a bad batch of paint today. I have seen this in the past, but with today's digital world, plus paint manufactures, it's even more a rarity purchasing inferior paints.
Another case where a paint may not hold, grab properly is something underneath, causing it to lift up. Brand new freshly milled wood, especially pine sees sap leaking out of knotholes, or open grain. If this sap is not addressed & removed, even finest house paints will ultimately fail.
You may not see paint failure first few days after it's applied, but any material or foreign matter not addressed, will act like a time-clock, eventually causing it to fail.
Areas with very high humidity, moisture on top of paint, or trapping moisture underneath paint coating will have negative paint curing processes.
Below are common reasons, with remedies, how to fix several different paint failures such as blisters, bubbles, chipping and/or peeling.
A common phrase in the painting world, directly relating to this topic is;
"Paint is not smart, it is only as good as the substrate it covers."
Keeping this thought top of your mind while painting, will increase a paint's longevity also proper adhesion.
Typical Paint Chipping, Peeling Cause & Solutions
Why Is My Exterior Paint Chipping, Peeling On Wood?
Knowing how to repair from peeling paint on wood is easiest accomplished by scraping old dried paint off first. Important knowing what type of wood you are working with. If pine is wood having paint flaking paint off, this aged paint, currently peeling up, must completely be removed. Some paint properly bonded, no requirement of removal.
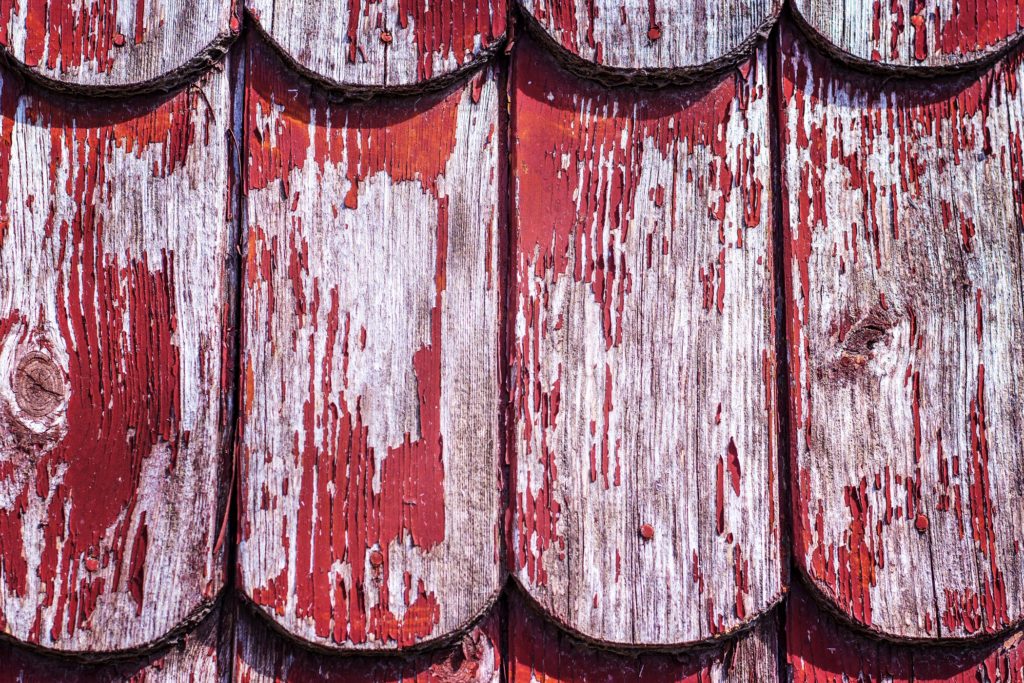
If painting cedar, using rough sewn side out, using a wire brush, cleaning any loose, peeling paint-stain off beforehand. No need to apply a primer, as paint-stains need to soak into wood 50%, leaving other 50% paint mil on top of this wood.
Reason why exterior paint peels up on wood, after it's cured & dried is moisture. Swelling wood up, drying back out, coupled with sun's uva/uvb rays also takes it's toll.
Allowing moisture underneath paint mils will undoubtedly, also eventually lift paint up in sheets. Again, this is why cedar shingles should never be painted with a solid paint-stain. Best using a semi-transparent stain on cedar shake shingles, as this will never chip, crack, peel, or flake.
How To Repair From Peeling On Wood
Repairing wood keeping wood from peeling is first providing wood a clean, dry surface to apply paint. With smooth surfaces, sanding should be included. Rough sawn wood, using a wire brush is best served, which removes peeling paint, but keeping rougher grain present.
Really determines which type of wood we are talking about. However, adequately removing aged, cracking, flaking paint currently lifting up is key.
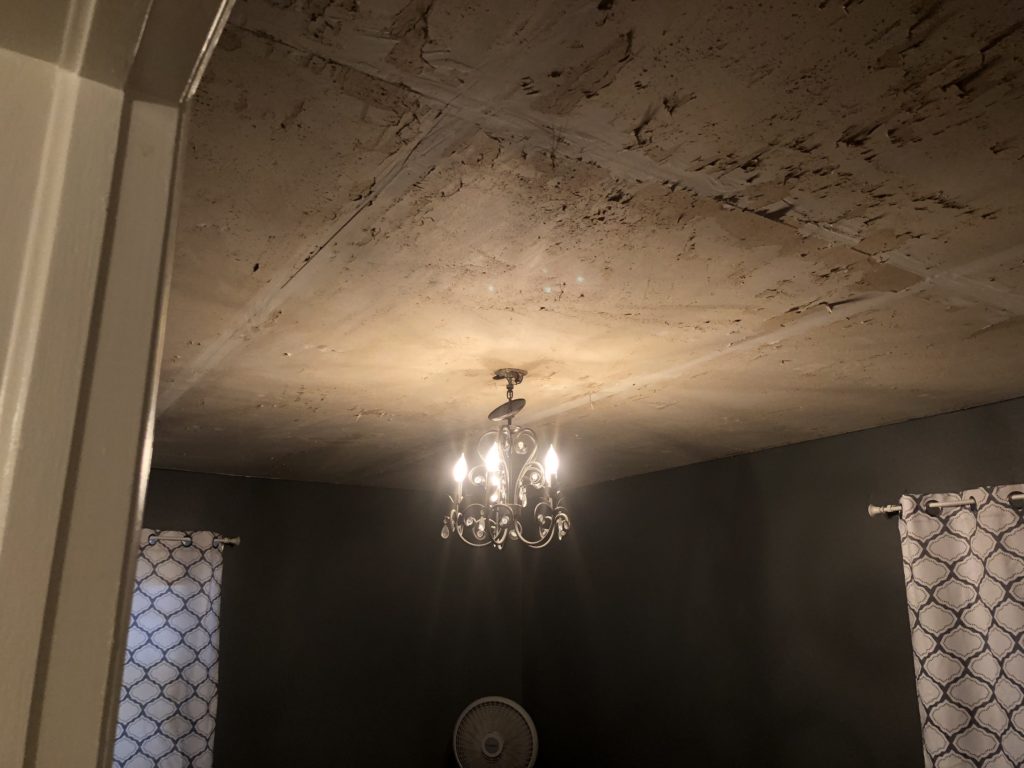
How To Correct Chipping, Peeling Paint From Ceiling
As this ceiling paint peeling off plaster ceiling, paint had to be completely scraped off, back down to plaster ceiling surface. This is the only way to rectify peeling paint, is remove all of it. I know it's a lot of work ahead of you, but you'll enjoy fruits of your labor years to come.
Paint Peeling Off Of Walls While Painting
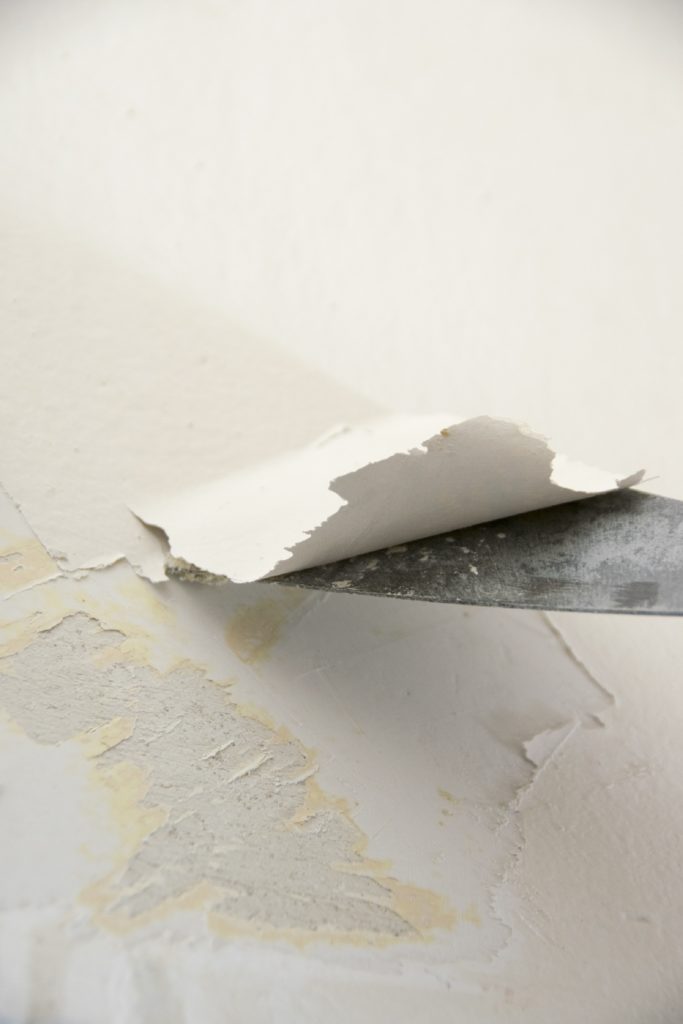
Just as ceiling paint peeling off plaster ceiling surfaces, if paint peeling off of walls while painting, you must stop before going any further. Best to take a razor knife, scoring wall, like a doctor doing exploratory research. Seeing what is causing this.
If outer paper from drywall is lifting up with new paint, don't throw your hands up. Great news! Wipe off any fresh paint, allowing everything to dry, normally 30mins. Purchase an interior flat primer, rolling this out.
If you wish this primer to dry even quicker, you can add a small amount of Japan Drier in your primer. This will speed up drying process, not causing paint peeling off of walls due to drywall paper surfaces causing this.
Important to know, if paint peeling off like wallpaper, rest assured you probably have a layer of wallpaper underneath, sometimes previously painted. If this happens, I would use same Japan Drier additive to your best interior paint first. Allowing paint to quickly dry, not lifting up paint.
Paint Peeling Up Like Wallpaper
If paint continues to peel up like wallpaper, having used Japan Drier, time to scrape all this off, getting down to a universal substrate that you can work with. Allowing to dry completely, you might be best served skim coating drywall mud over this, sanding to smooth surface. Once smooth, allows you to apply any drywall texture you prefer.
After drywall is prepared, be sure to use a drywall primer, before paint. These steps outline will cure any paint peeling up like wallpaper, giving you a premium wall finish.
Putting on final wall paint, you're at liberty using another small amount of Japan Drier in interior latex paints of any paint sheen.
Fixing Cracking, Peeling, Blistering Paint
Hope this article is beneficial to you, understanding root causes of paint failures, and how to fix them. There are so many different examples, too many to mention, with variety of different paints, also substrates. How they all react as soon as you apply a paint coating, to proper adhesion properties.
Providing firsthand knowledge what contractors, and their professional painter use on a daily basis. One good rule of thumb is observing paint on a weekly or monthly basis, looking for any signs of deterioration. If no signs present, continue looking, as paint fades as it ages.
Once exterior paint has faded out, even without it cracking, chipping, bubbling, or blistering, it's still time to paint. Paint fade is the first thing to go, breaking it's chemical formulation down, not protecting wood underneath.
Keeping a paints fresh elasticity, pliable coating on your home is best remedy no matter where you live. Best following ideas listed above, also with paint manufacture's recommendations, you should not have any of these issues of paint failures.
If you've enjoyed, please like, share, and/or comment below!





[…] areas which require sanding is where any previous paint has failed, by bubbling, blistering, chipping, or peeling. These areas need to be sanded to a feather edge, sanding paint edges where paint is left. Sanding […]
[…] about what to avoid, paint failures, such as bubbles, blisters, chips, & peels, to how to avoid paint flashing, streaks, & lap […]
[…] all lifetime paints are warrantied against cracking, bubbling, blistering, peeling, or chipping for the life you own your home. If paint fade takes place first, which it will, this can be root […]
[…] 24 hours) it is absolutely necessary to scrape and remove any visible paint that is lifting up, peeling, cracking, blistering, or bubbling. Reason for this is your exterior paint is designed to bond to a primed or previously painted […]
[…] will go much quicker & easier with proper tools. Starting at the most obvious place, like a bubble, chip, or blister, working outward all […]
[…] FlexShield™ 365 Technology – year-round resistance to cracking and peeling […]